
회원가입 페이지 구현하기 : input 유효성 검사와 에러 메세지 출력
회원가입 페이지에서 사용자가 데이터를 입력하면, 유효성 검사를 하여 문제가 있는 경우 경고 메세지를 출력하는 부분을 구현했다.
개발 기록 이어가기
구현이 어려웠던 부분이나 기록하고 싶은 부분 정리
생년월일 유효성 검사 (feat.윤년)

<div class="info" id="info__birth">
  <div id="birth-flex">
    <select class="box" id="birth-year">
      <option disabled selected>출생 연도</option>
    </select>
    <select class="box" id="birth-month">
      <option disabled selected>월</option>
    </select>
    <select class="box" id="birth-day">
      <option disabled selected>일</option>
    </select>
  </div>
  <div class="error-msg"></div>
</div>
사용자가 선택한 생년월일이 유효한 날짜가 아닐 경우 에러 메세지를 출력하기 위해 .error-msg 요소를 하나 추가했다.
// [year, month, day]
const birthArr = [-1, -1, -1]
const birthErrorMsgEl =
  document.querySelector('#info__birth .error-msg')

birthYearEl.addEventListener('change', () => {
  birthArr[0] = birthYearEl.value
  // 유효 날짜 여부 확인
  checkBirthValid(birthArr)
});

birthMonthEl.addEventListener('change', () => {
  birthArr[1] = birthMonthEl.value
  checkBirthValid(birthArr)
});

birthDayEl.addEventListener('change', () => {
  birthArr[2] = birthDayEl.value
  checkBirthValid(birthArr)
});

/* 유효한 날짜인지 여부 확인 (윤년/평년) */
function checkBirthValid(birthArr) {
  isBirthValid = true
  y = birthArr[0]
  m = birthArr[1]
  d = birthArr[2]
  // 생년월일 모두 선택 완료 시
  if(y > 0 && m > 0 && d > 0) {
    if ((m == 4 || m == 6 || m == 9 || m == 11) && d == 31) {
      isBirthValid = false
    }
    else if (m == 2) {
      if(((y % 4 == 0) && (y % 100 != 0)) || (y % 400 == 0)) { // 윤년
        if(d > 29) { // 윤년은 29일까지
          isBirthValid = false
        }
      } else { // 평년
        if(d > 28) { // 평년은 28일까지
          isBirthValid = false
        }
      }
    }

    if(isBirthValid) { // 유효한 날짜
      birthErrorMsgEl.textContent = ""
      account.birth = birthArr.join('')
    } else { // 유효하지 않은 날짜
      birthErrorMsgEl.textContent = "생년월일을 다시 확인해주세요"
      account.birth = null
    }
  }
}
(화면 녹화를 하면 select box가 보이지 않는다)
먼저 년, 월, 일을 담기 위한 배열을 하나 생성했다. 그리고 select 태그의 옵션을 선택할 때마다 birthArr 배열의 년, 월, 일에 해당하는 원소를 선택한 값으로 변경하고 isBirthValid 함수를 호출한다.
- 년, 월, 일 옵션이 모두 선택되었을 때만 검사
- 4, 6, 9, 11월의 31일 유효하지 X
- 2월은 윤년은 29일까지, 평년은 28일까지 유효
isBirthValid 함수는 위 조건들을 고려하여 해당 날짜가 유효한지를 판단하여 유효하지 않을 경우 에러 메세지를 출력한다.
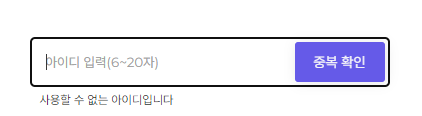
아이디, 휴대폰 번호 유효성 검사
/*** SECTION - ID ***/
const idInputEl = document.querySelector('#info__id input')
const idErrorMsgEl = document.querySelector('#info__id .error-msg')
idInputEl.addEventListener('change', () => {
  const idRegExp = /^[a-zA-Z0-9]{6,20}$/ // 6~20자의 영문 소문자와 숫자
  if(idRegExp.test(idInputEl.value)) { // 유효성 검사 성공
    idErrorMsgEl.textContent = ""
    account.id = idInputEl.value
  } else { // 유효성 검사 실패
    idErrorMsgEl.textContent = errMsg.id.invalid
    account.id = null
  }
  console.log(account)
});
ID는 “6~20자의 영문 소문자와 숫자” 조건을 만족하도록 했다. 정규식 /^[a-zA-Z0-9]{6,20}$/을 test 함수로 입력된 데이터와 비교하여 조건을 만족하는지 확인했다. 유효한 데이터일 때만 account 객체에 입력을 하고, 유효하지 않을 경우 의도적으로 비어있음을 표현하기 위해 null을 할당했다.
휴대폰 번호도 위와 동일한 방식으로 구현을 했고, 정규식만 /^010([0-9]{8})$/로 수정했다. 010XXXXXXXX 형식의 입력만 유효하게 처리되도록 하고 나머지의 경우에는 에러 메세지를 보여주었다.
// 에러 메세지 객체
const errMsg = {
  id: {
    invalid: "6~20자의 영문 소문자와 숫자만 사용 가능합니다",
    success: "사용 가능한 아이디입니다",
    fail: "사용할 수 없는 아이디입니다"
  },
  pw: "8~20자의 영문, 숫자, 특수문자를 모두 포함한 비밀번호를 입력해주세요",
  pwRe: {
    success: "비밀번호가 일치합니다",
    fail: "비밀번호가 일치하지 않습니다"
  },
  birth: "생년월일을 다시 확인해주세요",
  mobile: "‘-’ 제외 11자리를 입력해주세요"
}
그리고 유효하지 않을 경우에 에러 메세지를 idErrorMsgEl 요소의 컨텐츠를 추가했다. 에러 메시지의 경우도 아래와 같이 따로 객체로 만들어서 사용하였다. 이렇게 했을 때 추가, 변경, 조회 등 관리를 편하게 할 수 있다.
비밀번호와 재입력 유효성 검사
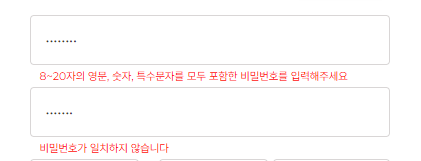
비밀번호의 경우 비밀번호와 재입력을 모두 고려해야 하다보니 조금 까다로웠다. 일단 기본적으로 비밀번호는 “8~20자의 영문, 숫자, 특수문자를 모두 포함” 조건을, 재입력란은 비밀번호와 일치하는 문자열인지 확인한다. 두 조건이 모두 만족했을 때만 비밀번호를 유효하다고 판단했다.
// pwVal: 패스워드, pwReVal: 패스워드 재입력, isPwValid: 패스워드 유효 여부
let pwVal = "", pwReVal = "", isPwValid = false
const pwInputEl = document.querySelector('#info__pw input')
const pwErrorMsgEl = document.querySelector('#info__pw .error-msg')
pwInputEl.addEventListener('change', () => {
  const pwRegExp = /^(?=.*[A-Za-z])(?=.*[0-9])(?=.*[!@#$%^&*])[a-zA-Z0-9!@#$%^&*]{8,20}$/
  pwVal = pwInputEl.value
  if(pwRegExp.test(pwVal)) { // 정규식 조건 만족 O
    isPwValid = true
    pwErrorMsgEl.textContent = ""
  }
  else { // 정규식 조건 만족 X
    isPwValid = false
    pwErrorMsgEl.textContent = errMsg.pw
  }
  checkPwValid()
  console.log(pwVal, pwReVal, isPwValid, account)
});

/*** SECTION - PASSWORD RECHECK ***/
const pwReInputEl = document.querySelector('#info__pwRe input')
const pwReErrorMsgEl = document.querySelector('#info__pwRe .error-msg')
pwReInputEl.addEventListener('change', () => {
  pwReVal = pwReInputEl.value
  checkPwValid()
  console.log(pwVal, pwReVal, isPwValid, account)
});
비밀번호를 입력/변경할 때마다 정규식 조건을 만족하는지를 test하여 isPwValid 변수에 결과를 저장했고, 입력란과 재입력란이 변경될 때마다 checkPwValid 함수를 수행하도록 했다.
// 비밀번호와 재입력 값 일치 여부
function checkPwValid() {
account.pw = null // default null 처리
if(pwReVal === "") { // 미입력
pwReErrorMsgEl.textContent = ""
}
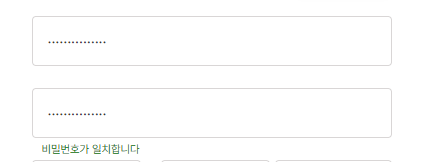
else if(pwVal === pwReVal) { // 비밀번호 재입력 일치
if(isPwValid)
account.pw = pwVal
pwReErrorMsgEl.style.color = "green"
pwReErrorMsgEl.textContent = errMsg.pwRe.success
}
else { // 비밀번호 재입력 불일치
pwReErrorMsgEl.style.color = "red"
pwReErrorMsgEl.textContent = errMsg.pwRe.fail
}
}
checkPwValid 함수에서는 비밀번호와 재입력란이 일치하는지 여부를 판단하여 유효한 데이터인지를 확인한다. 비밀번호 입력란과 재입력란 데이터가 일치하면서 정규식 test 결과가 true인 경우에만 유효하다고 판단하여 account 객체의 pw 속성의 값으로 추가했다.

비밀번호 입력 조건에 따른 pwVal, pwReVal, isPwValid 변수와 account 객체를 출력해보았다. 에러 메세지 출력과 객체 속성 값 할당이 정상적으로 동작하고 있음을 확인할 수 있다.
가입하기 버튼 클릭 시 상단부터 데이터 이상 확인
- 미입력/이상 데이터 존재 시 상단 필드부터 아래 방향으로 순서대로 에러 메세지 표시
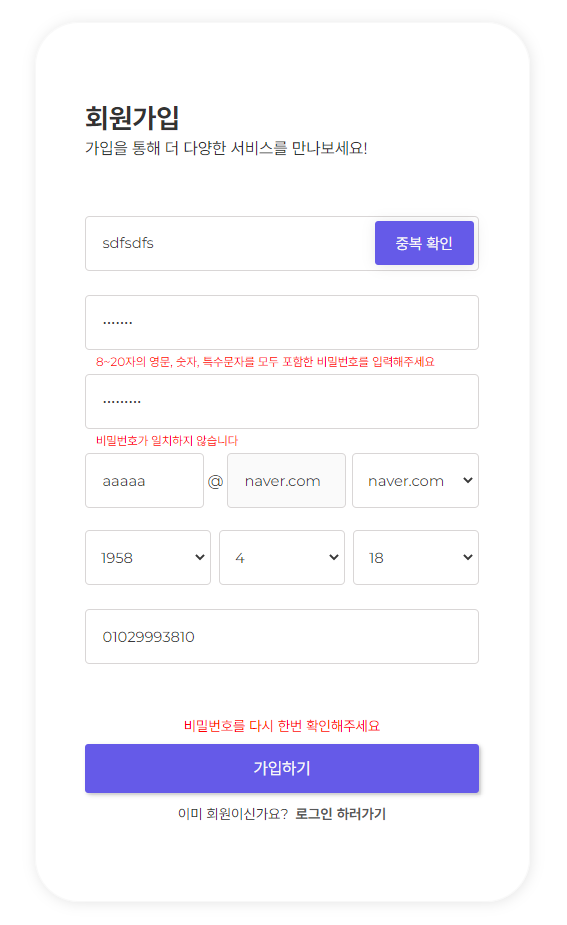
- 모든 데이터 입력 & 유효성 검사 완료 시 alert로 객체 출력 (서버 연결 X)
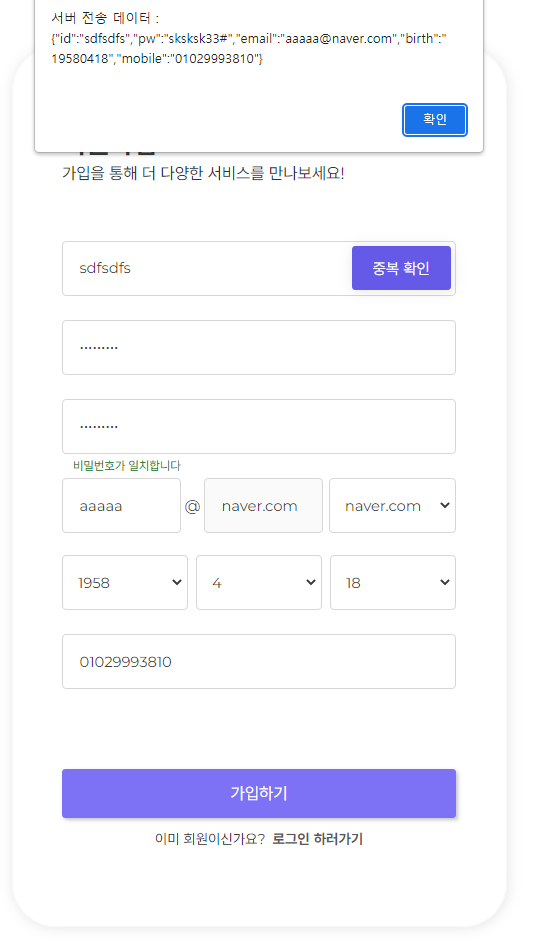
/*** SUBMIT ***/
const submitBtn = document.querySelector('#submit')
const resultFailEl = document.querySelector('#result-fail')
submitBtn.addEventListener('click', function() {
  let isAllFilled = true
  const word = {
    id: "아이디를",
    pw: "비밀번호를",
    email: "이메일을",
    birth: "생년월일을",
    mobile: "휴대폰 번호를"
  }
  for(element in account) {
    if(account[element] === null) {
      resultFailEl.textContent = word[element] + " 다시 한번 확인해주세요"
      isAllFilled = false
      break
    }
  }
  if (isAllFilled === true) {
    resultFailEl.textContent = ""
    setTimeout(function() {
      alert("서버 전송 데이터 : " + JSON.stringify(account))
    }, 300)
  }
})
객체의 모든 element를 상단 속성부터 돌면서 null인 것을 찾으면 에러 메시지를 출력하고, 모든 속성의 값이 유효한 경우 alert를 통해 객체를 출력하도록 구현하였다.
input, button focus 디자인 변경
/* input focus시 outline 색상 변경 */
.box:focus {
  outline: 1px solid #665ae870;
}

/* button tab으로 focus 할 때 (키보드 포커스 처리) */
button:focus-visible {
  outline: 0px solid #9191dfab;
  background-color: rgb(125, 114, 245);
}

/* hover시 색상 변경 */
button:hover {
  outline: 0px solid #9191dfab;
  background-color: rgb(125, 114, 245);
}
input은 focus될 때 border의 색상이 변경되는 것이 아니라, outline이 추가되는 것이다. 그래서 완전히 색상을 변경하고 싶다면 border 값도 none 처리를 해주어야 한다. 나는 원래 input의 border 색상이 진하지 않아, border 색상은 유지하고 outline의 색상을 메인 컬러와 비슷한 색으로 선택했다.
버튼의 경우에는 focus-visible 가상 클래스가 추가됐을 때 보이는 outline을 제거하고, 색상을 연하게 변경했다.
div 텍스트 생성, 제거 시에 공간 유지
유효성을 검사해서 문제가 있을 경우 에러 메세지를 출력하고, 없을 경우 출력하지 않는다. 이때 위처럼 div에 텍스트가 생성될 때 블럭이 공간을 차지하면서 아래 컨텐츠가 밀리는 현상이 나타났다.
.info .error-msg {
  position: absolute;
  ...
}
position을 absolute로 설정하면 해당 요소가 띄우는 효과가 나타난다. 이를 이용해서 간단하게 해결했다.
Leave a comment